Panels
Node Tree Panel
The panel is located in the Property panel under Sverchok tab in Sverchok tree editor. To open the panel pres N and select Sverchok tab.
Layout manager
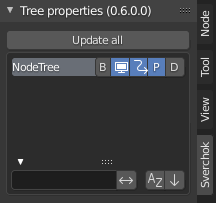
Layout manager
This panel allows to manage Sverchok layouts as easy as you press buttons on an elevator.
- Update all
In case if automatic tree update is turned off it is possible to make update manually. Update all will update all trees and Update “Current tree name” button on active tree panel will update only current tree.
List to quickly pick layout, switch between them with buttons instead of popup list. Also have settings:
Button |
Function |
|---|---|
B |
bake this layout - will gather all layout’s viewer draw and viewer text to bake them. Bake only if bakeable button is active on node, else ignore. |
Show layout |
Controls all OpenGL viewer of this layout. Viewer, Stethoscope and Viewer Indices |
Animate layout |
to animate the layout (or not) - may preserve you time. |
Process layout |
Automatically evaluate layout while editing, disable for large or complex layouts (F6) |
Draft Mode |
Switch tree to Draft mode (F7) |
Note: It is possible to filter trees by its names via standard blender interface right below the list.
Active Tree Properties
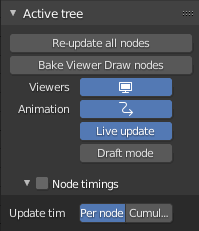
Active tree panel
- Re-update all nodes operator
It reevaluates a whole tree regardless to updated state of its nodes and the live update option.
- Bake Viewer Draw nodes operator
All Viewer Draw nodes will generate generate Blender meshes from their input data in current scene.
- Show viewers
It controls showing state of all Viewer nodes in the tree.
- Animate
If enabled the tree will be reevaluated upon frame change. The update can effect not all nodes but only those which have property to_animate enabled.
- Live update
If enabled it means that the tree will be evaluated upon changes in topology or changes in properties of a node made by user. This property does not effect evaluation upon frame changes or by Re-update all nodes operator. Enabling the property will call the tree topology changes trigger.
- Draft mode
It switches to draft property in A number node and some others. Its usage is to add set of draft properties to the node tree to improve performance.
Node timings
- Enabling
Show last execution time for each nodes in the tree.
- Update time mode
- Per node
Showed time of a node includes only its execution period.
- Cumulative time
Showed time of a node includes time of its execution and execution time of all previous nodes.
Tree UI options
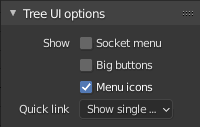
- Socket menu
It adds a menu to all output sockets. With functionality of the menu you can add post processing steps which can change shape of output data of a socket.
- Big buttons
Some buttons become big.
- Menu icons
To show icons in Shift+A (Add node) menu.
- Quick link modes
Do not show
- Show single option only
Show the button only for cases when there is only one node to be created can be suggested; do not show the menu
- Show Create parameter options
Show the button with a menu with options to create parameter nodes
General utils panel

Check for updates - finds if master branch on github has new version of Sverchok. In future there will be releases, but now dangerous update.
Show Last Commits - Show lastests commits in info panel and terminal
Upgrade Sverchok - upgrades Sverchok from github with new version - button appears only if ‘check for updates’ finds a new version.
Nodes Toolbar
To see this panel it has to be enabled in the Sverchok properties inside the Blender Preferences Panel -> Add-ons -> Sverchok. There you can choose if to display it on the “N panel” or the “T panel”. Also you can choose if you want to display only the icons
The panel presents all nodes available, organized in categories with a search menu.
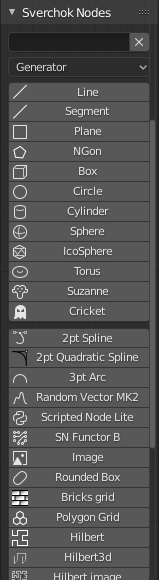
You can add node to the tree by clicking corresponding button and dragging placing the node in the node-tree.
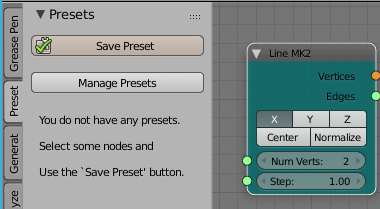
Presets Panel
This is a second tab under the T panel. This is how it looks by default:
Introduction to Presets
Preset is a named set of stored settings of one of several nodes. You can:
Save settings of one or several selected nodes (links between nodes are saved too) under specific name.
Use saved preset in another node tree later.
Import and export presets as .json files.
Share presets with other users via gist.github.com service, or import presets made by other users.
Each preset belongs to some preset category. By default, all presets are in special category named “General”.
There are special categories for presets of settings of nodes of specific types; such categories can store only settings of nodes of this type. Such categories are distinguished with a prefix “/Node/” in their titles. For example, a category with name “/Node/ Box” can contain only settings of the “Box” node. Such categories are created automatically.
Among per-node presets, you can define a preset with special name Default.
Such preset will be automatically applied to the node of this type when you
create it by selecting from Shift-A menu, from Search menu or from T panel (but
not when it is created as a part of another preset being used).
Presets are saved as .json files under Blender configuration directory, in datafiles/sverchok/presets. Preset categories are represented as directories under that one.
It can be good idea to store as a preset (and maybe share) the following things:
One node with a lot of settings, if you think this is “good” settings and you are going to use the same settings many times.
Scripted node, or “Mesh Expression” node, or one of other nodes that use Blender’s text blocks as settings. Such nodes are stored together with corresponding text.
Several linked nodes, that do some completed thing, for later usage “as-is”.
Several linked nodes, that are “sort of going to be needed in this combination often”, so that later you can start with this preset and add some nodes to it or tweak it somehow.
There are some presets distributed with Sverchok itself. You can not edit or
remove such presets from Blender’s UI. Such presets are marked with a word
[standard] in tooltips of corresponding buttons in the Presets panel.
Panel Buttons
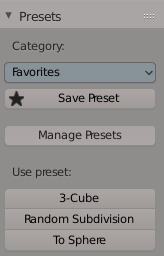
At the top of the Presets panel, there is a drop-down menu, which allows you to select the category of presets to work with. By default, there is only one category named “General”. All buttons placed below this menu work inside the selected category.
The Presets panel has the following buttons:
Save Preset. This button is only shown when there are some nodes selected in the tree. When you press this button, it asks you for the name under which this preset should be known. You need to enter some descriptive name and press Ok. After that, the preset will become available in the lower part of the panel.
When there is a presets category of specific node type selected, the “Save Preset” button is only available when a single node of corresponding type is selected.
Manage Presets. This is a toggle button. It switches you between “presets usage mode” (which is the default, when button is not pressed) and “presets management mode” (when the button is pressed).
Contents of lower part of the panel depend on whether the Manage Presets button is pressed.
When management mode is disabled, there is a button shown for each preset that you already have:
By pressing such button, you add nodes saved in corresponding preset into current tree. New nodes are automatically selected, so that you can move them to another part of the node view.
When management mode is enabled, there are more buttons:
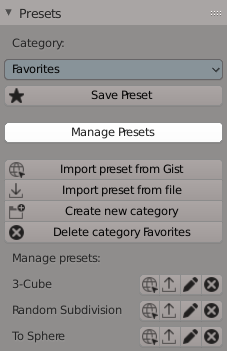
Import preset from Gist. You will be asked for Gist ID or full URL of the gist, and preset name. If you have gist URL in the clibpoard, it will be pasted automatically.
Import preset from file. File browser will appear to allow you to select a .json file to import. In the left bottom part of this file browser, there is mandatory text field asking you to enter preset name.
Create new category. You will be asked for the name of the category. Category name must be correct directory name (for example, it can not contain / character). Category name must be unique.
Delete category {NAME}. You will be asked for confirmation. Only empty category can be deleted.
The following buttons (in this order) are shown for each preset you have:
Export preset to Gist. Preset will be exported to gist service. Gist URL will be automatically copied into clipboard.
Export preset to outer file. File browser will appear asking you to select where to save the preset.
Edit preset properties. A dialog will appear allowing you to change the following properties of preset: Name, Description, Author, License. The Description attribute will be used as a tooltip for preset button.

Delete preset. You will be asked for confirmation.
It is not possible to edit or remove presets that are distributed with Sverchok.
Node’s N panel
The panel in the right part of node editor window is toggled by the N keyboard shortcut, so it is called the N panel. Here we will consider the first tab of this panel, named “Item”. This tab contains some information and parameters concerning the currently active node. It is not shown if there is no active node in the tree.
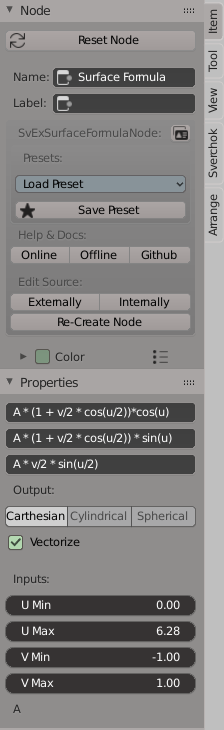
The “Item” tab of the N panel contains the following parts:
Node rolldown:
Name: node name. This is an identifier of the node within the tree. If you try to give the node a name, which is already taken by another node, Blender will automatically add something like
.001to the name.Label: node label to be displayed in the node editor. If not specified, then the node name will be used.
Below that, there is a text box displaying the identifier of the type of active node (so-called
bl_idname). It may be useful for scripting or for searching information about the node. The button next to the text box copies that identifier into the clipboard.Following is the Presets section. It contains:
Load Preset menu. This dropdown menu contains all presets that were created for this type of node. Select a preset from the menu to apply it. Settings loaded from the preset will overwrite current settings of the node. Note: the same menu is available in the node editor, when a node is active, by Shift-P shortcut.
Save Preset button. Save current settings of the node as a new preset. You will be asked for a name for the new preset.
You can edit and remove your presets in the Presets section of the node editor’s T panel, if you enable the Manage Presets mode (see description above).
Help & Docs section. This contains buttons for accessing the documentation of currently active node.
Edit Source section allows you to edit the source code of the node:
Externally. Open an external text editor application to edit the file.
Internally. Load the source code of the node into Blender’s text block.
Re-Create Node button. This removes the node and replaces it with a new instance of the same node, trying to save all node’s settings and connections. This button is mostly useful in the development stage of the node, if you for some reason have to re-initialize the node.
Properties rolldown. This contains all specific settings of the active node type. For most types of nodes, this contains all the same parameters that can be found in the node interface itself. Some types of nodes have additional parameters here - usually ones you do not have to change in most cases, or some kind of “advanced parameters”.
3D Panel
With this panel your layout becomes addon itself. So, you making your life easy. Since Blender 2.8 this panel has two instances. One instance located on N panel in Tool category of 3D editor. Another located in Active tool and workspace settings shelf of Properties editor.
Start live update - will start update layouts by a timer (several times in second)
Update all trees - manual update of all layouts
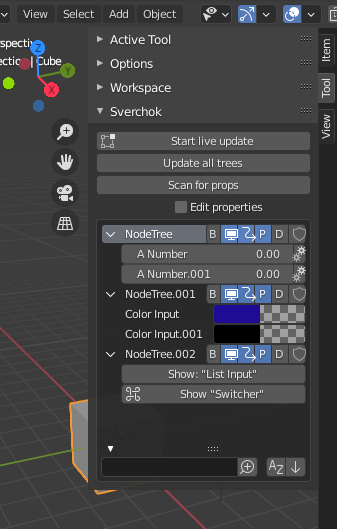
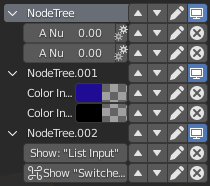
Node properties list
Some nodes can display their properties on the 3D panel. For this you have to turn on an appropriate property on N panel of selected node in a node tree.
- Some nodes which can displayed its properties on th 3D panel:
A number
Color input
List Input
Objects in
Viewer BMesh
Scan for props - Nodes which should display their properties on the panel will be added and which should not will be removed from the panel. Order of existing items will be unchanged.
Edit properties - turn property list into edit mode it will add extra buttons form managing the list
Note: in edit mode it is possible to change order of items, rename items, remove displaying node properties in list, torn on/off displaying node tree in list. It is recommended to rename nodes and trees via list interface otherwise for properly displaying items `scan for props` button should be pressed after each renaming. Changes node labels can be renamed from other UI in case if filtering properties are not going to be used.
filter (below list) - can be used for filtering properties
In normal mode tree items display the same properties as layout manager
Import Export Panel
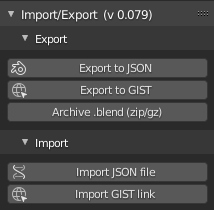
location: N panel.
Export
feature |
description |
|---|---|
Export to JSON |
To save node tree in JSON format, see note what information are putted into a file |
Export to GIST |
It creates JSON file from current tree and upload it into your github account. It will let you quickly share your trees with other users For using the button you have generate token and put it in the addon preferences. |
Archive .blend |
It will let to put current file into zip or gz archive. Current file should be saved. Archive will be created in the same directory. |
Note: JSON file stores:
Node state: location, hidden, frame parent
Node parameters: (internal state) like booleans, enum toggles and strings
connections and connection order (order is important for dynamic-socket nodes)
Import
feature |
description |
|---|---|
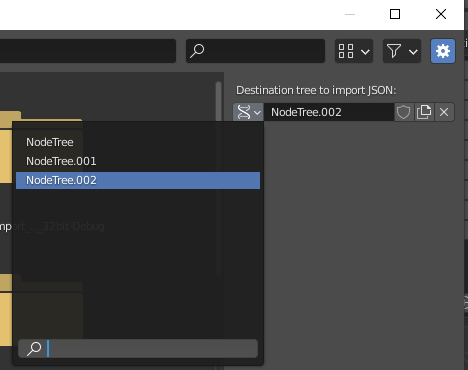
Import JSON file |
Download tree from json file. It is possible to choose existing layout where new tree should be added. |
Import GIST link |
It will let to import tree into current layout. Clipboard should contain GIST link. |
Note: choosing tree where to put importing tree:
Warnings
Consider this whole IO feature experimental for the time being. You use it at your own risk and don’t be surprised if certain node trees won’t export or import (See bug reporting below). The concept of importing and exporting a node tree is not complicated, but the practical implementation of a working IO which supports dynamic nodes requires a bit of extra work behind the scenes. Certain nodes will not work yet, including (but not limited to) :
Node |
Issue |
|---|---|
Object In |
the json currently doesn’t store geometry but an empty shell without object references instead |
SN MK1 |
currently this auto imports by design, but perhaps some interruption of the import process will be implemented |
Why make it if it’s so limited?
Primarily this is for sharing quick setups, for showing people how to achieve a general result. The decision to not include geometry in the Object In references may change, until then consider it a challenge to avoid it. The way to exchange large complex setups will always be the .blend, this loads faster and stores anything your Tree may reference.
While importing I see lots of messages in the console!
Relax, most of these warnings can be ignored, unless the Tree fails to import, then the last couple of lines of the warning will explain the failure.
Bug Reporting
By all means if you like using this feature, file issues in this thread. The best way to solve issues is to share with us a screenshot of the last few lines of the error if we need more then we will ask for a copy of the .blend.
Templates in menu panel of nodes area
You can use embedded templates in Sverchok. They are stored in json folder as jsons for import to Sverchok.
